
How to use ChatGPT with Siri on your iPhone: The most effective way
How to use ChatGPT with Siri on your iPhone? In a few simple steps, you can leverage ChatGPT’s strength to increase Siri’s functionality. Check out the article of Exviews to learn more!
Requirements to prepare before using ChatGPT with Siri on your iPhone
To successfully use ChatGPT with Siri, you need to prepare some tools and accounts. Let’s go through each requirement in detail below.
Compatible devices
The first and most important requirement is that you need to own an iPhone running iOS 16.4 or later. This is the minimum version to ensure the Shortcuts app works stably and supports use with ChatGPT.
OpenAI account and ChatGPT API key
And to be able to integrate ChatGPT into Siri, you need an OpenAI account. This account will provide you with a unique API key. It acts as a key to access ChatGPT’s service.
Shortcuts app on iOS
The Shortcuts app is essential for creating shortcuts and built-in commands for Siri. It’s usually available on iOS, but you should check and update to the latest version.

How to use ChatGPT with Siri on your iPhone?
It’s easy to use ChatGPT with Siri on an iPhone. You can take use of AI’s incredible potential with a few easy actions.
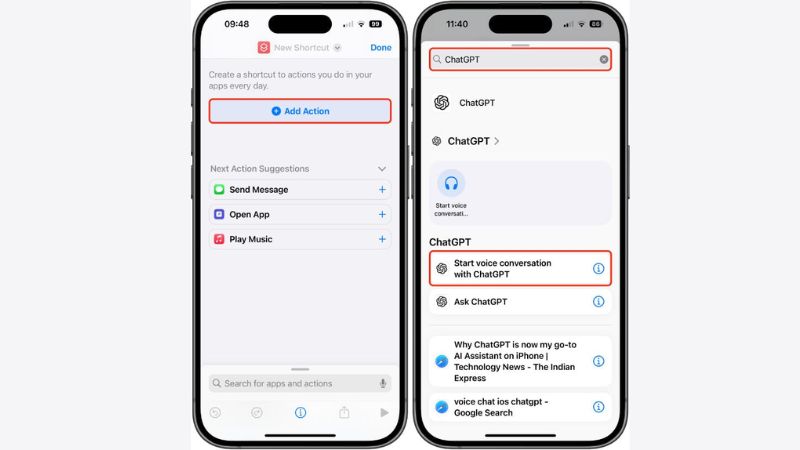
Step 1: Install Siri Shortcuts on iPhone
First, confirm that your iPhone has the Shortcuts app loaded. This comes by default on iOS, but if you’ve deleted it or haven’t updated it, head to the App Store and download the latest version.
Once you open the app, you’ll need to create a new shortcut to trigger ChatGPT. To do so, select the + icon in the top right corner of the screen and enter a name of your choice, such as ChatGPT Siri. This name will be the command you’ll use to summon Siri to trigger ChatGPT in the future.
Step 2: Generate API Key from OpenAI ChatGPT account
In this step, you need to get the OpenAI API key to use the chatGPT service.
- First, you need to access https://beta.openai.com/account/api-keys and log in to your OpenAI account.
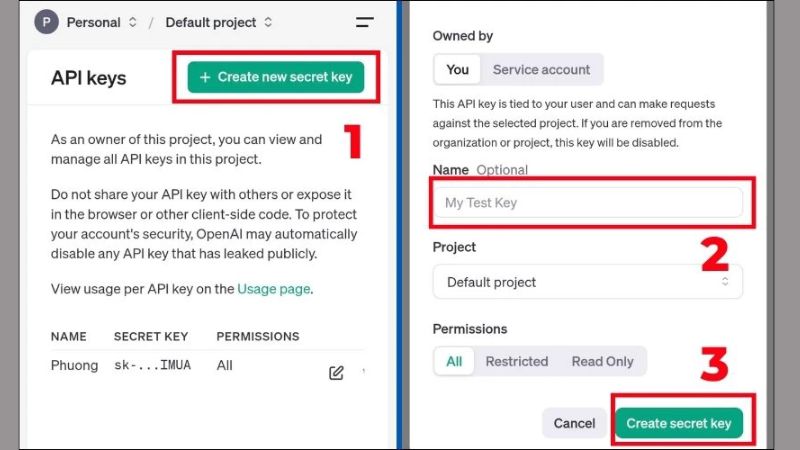
- Then, the interface will display the API codes that your ChatGPT has. You click Create new secret key to create a new API code. To create this new API code, you need to fill in the Name information and click Create secret key.
Next, select Copy to copy the newly created API code and save it carefully.
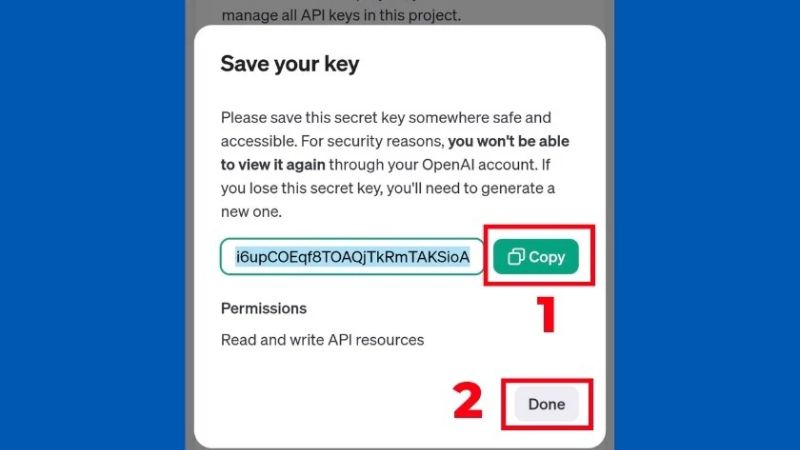
Please note that if you press Done before copying, the API key will not be available for review. Please make sure to copy and store the API key securely.
Step 3: Set up Siri Shortcuts to call ChatGPT via API
Once you have the API key from OpenAI, you need to set up Siri Shortcuts to connect Siri to ChatGPT. This step will help you create API calls that allow Siri to communicate with ChatGPT to perform tasks on demand.
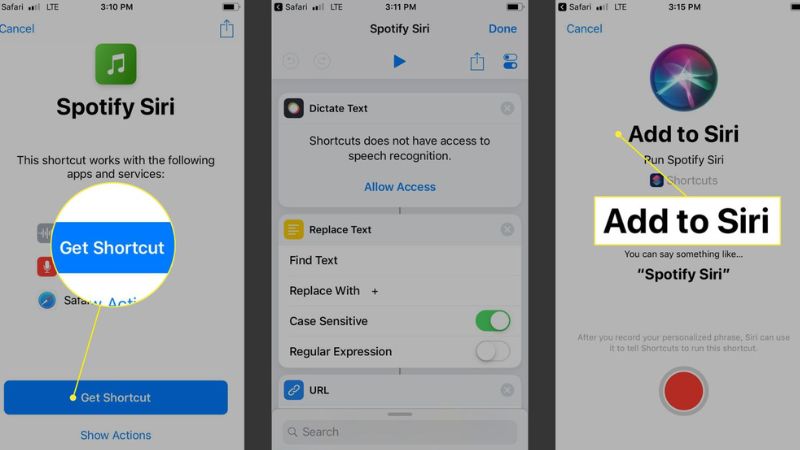
First, you need to open Safari and go to the GitHub page that has ChatGPT Siri (https://www.icloud.com/shortcuts/a0e7e6f919de42ce83ffd2af38f653c7). Then, you click on Get Shortcut. This will switch to the iPhone Shortcuts app. You need to click on Set Up Shortcut.
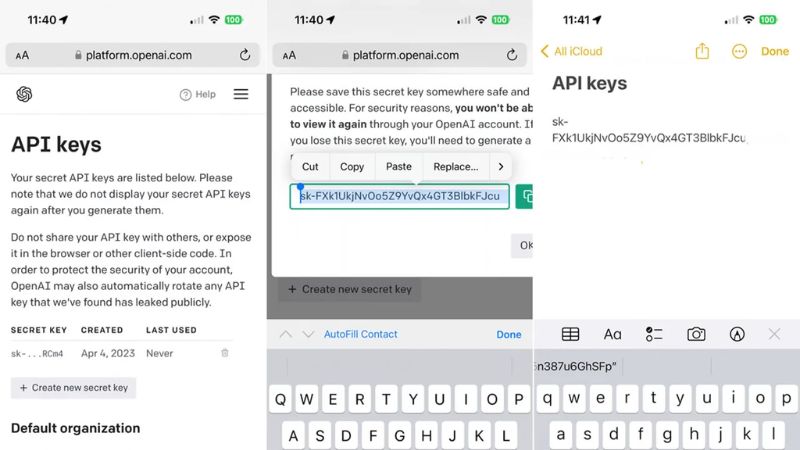
Here, you paste the key you created above into the box and click Next. Next, you continue to click Add Shortcut to create a new one on iPhone.
Step 4: Customize commands to trigger ChatGPT with Siri
In this step, you need to specify the command that you want Siri to recognize to trigger ChatGPT. To customize the command, you need to go to the Shortcuts app and tap on the ChatGPT shortcut that you just created above. Next, you need to enter the command and tap Done to complete.

Depending on your needs, you can set the command you want to make the operation process faster and more effective. At this time, Siri can accurately recognize your commands and help you connect to ChatGPT faster.
Why use ChatGPT with Siri?
Using ChatGPT into Siri brings many outstanding benefits, helping to enhance the user experience with the virtual assistant. Here are the reasons why you should incorporate ChatGPT into Siri to optimize Siri’s performance and responsiveness.
Leverage the AI power of ChatGPT in virtual assistants
ChatGPT uses an advanced AI language model, allowing Siri to understand and respond with greater accuracy. This integration helps Siri not only answer simple questions but also solve complex requests. From there, the virtual assistant Siri can respond to a variety of user inquiries.
By applying ChatGPT’s deep learning capabilities, Siri can analyze the semantics of the question. This helps Siri provide the most appropriate response. As a result, conversations become more natural and optimize the user experience.

Expand Siri’s features
Thanks to the integration of ChatGPT, Siri can now perform tasks that were previously impossible. Such as making creative suggestions, answering in-depth questions. Siri can also provide information from external data sources. This makes Siri not only a virtual assistant but also a tool to improve the efficiency of users’ work, study and entertainment.
Furthermore, ChatGPT helps Siri expand the capabilities of the virtual assistant. With the support of ChatGPT, Siri can do more. With just a simple command, Siri can help you complete many tasks. Tasks such as sending messages, planning work or searching for information become easy and fast.
Enhance user experience with smarter responses
Thanks to ChatGPT’s AI, Siri can better understand the context and needs of users. From there, the virtual assistant can create accurate and appropriate responses. This helps improve the quality of interaction between users and virtual assistants.
With ChatGPT, Siri can respond more flexibly and naturally, creating an extremely pleasant and useful user experience. ChatGPT helps Siri learn from previous conversations, thereby improving its responsiveness and intelligence. This helps users feel like they are chatting with a real assistant, understanding and responding to requests correctly.

Notes when integrating ChatGPT into Siri
Secure ChatGPT API Key
Integrating ChatGPT into Siri has many benefits. However, there are some important factors to keep in mind to ensure effectiveness. The following tips will help optimize the user experience and take advantage of the power of ChatGPT.
Control access to Siri Shortcuts
Keeping your ChatGPT API Key secure is extremely important when integrating with Siri. If your API Key is leaked, others can use and abuse your account. To avoid this risk, please store your API Key in a safe place and do not share it publicly.
Additionally, you should regularly check and refresh your API Key as needed. This helps keep your security information up to date, protecting your data and account. This also reduces the risk of unauthorized access or attacks to your ChatGPT account.
Optimize ChatGPT’s responses in Siri
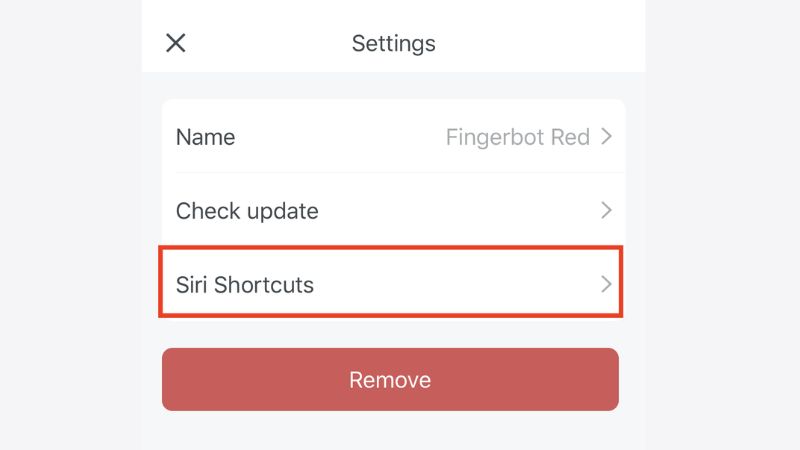
Controlling access to Siri Shortcuts helps you limit how others can change your shortcuts. It also prevents unauthorized use of shortcuts on your device. You can set up a password or fingerprint verification to protect access.
Additionally, you should regularly review the shortcuts you have created on your device and remove any unnecessary shortcuts. This helps protect your privacy and prevents unauthorized use of the features you have set up.

You Might Also Like …
- How do I Delete a Story on My Tiktok: Full Tutorial
- Temu Affiliate: The Simplest Guide to Making Money
- How to Connect LAN Easily at Home: A Complete Guide
How to use ChatGPT with Siri on your iPhone? We hope that after reading the material above, you have the correct response. Check out Exviews’ blog section for a range of ideas connected to Facebook, Instagram, TikTok, and Twitter if you find it helpful. See you in the upcoming piece!

Temu Affiliate: The Simplest Guide to Making Money
Have you heard of the Temu affiliate program? Temu caters to the diverse needs of consumers with a wide range of products, from electronics and fashion to home appliances and lifestyle items, being a leading e-commerce platform. In this article, Exviews will guide you on how to make money from Affiliate Temu and all the information you need to know about this affiliate program.
What is Temu?
Temu is an e-commerce platform that was founded in China and operates globally. Users can buy a wide range of products at attractive prices on this e-commerce platform.
Temu has everything you need, from fashion, cosmetics, and home appliances to electronics. Temu is famous for its extremely low prices as well as numerous deals, discounts, and free gifts. When shopping on Temu, buyers can enjoy secure payment options and privacy protection.

How does the Temu affiliate program work?
By using your online channels to promote Temu goods, you may make money through the Temu Affiliate Program. Here’s a simplified breakdown:
1. Sign Up:
If you do not already have a Temu account, create one. Next, go to the Temu Affiliate Program website and join up. You need to fill out the information requested, such as your name, email address.
2. Get Your Unique Affiliate Link:
Once approved, you’ll receive a unique affiliate link. Your secret to making commissions is this link.
3. Promote Temu Products:
Share your affiliate link via your blog, social media accounts, website, and other online platforms. Next, create engaging content, such as reviews, tutorials, or sponsored posts, to attract your audience. Finally, use various marketing strategies like social media marketing, email marketing, or influencer partnerships to promote Temu products.
4. Earn Commissions:
When someone makes a Temu purchase after clicking on your affiliate link, you will get a commission. Temu offers competitive commission rates, which can be quite lucrative, especially for popular influencers and content creators.
Key Points:
- High Commission Rates: Temu offers attractive commission rates on sales generated through your affiliate links.
- Easy to Join: The program has minimal requirements and a straightforward sign-up process.
- Diverse Product Range: You can promote a wide range of products, catering to different interests and demographics.
- Regular Promotions and Sales: Temu frequently runs promotions and sales, which can increase your earning potential.
By effectively promoting Temu products and driving traffic to their website through your affiliate link, you can earn a significant income from the Temu Affiliate Program.

How much do Temu affiliates make?
The Temu Affiliate Program provides affiliates with up to 20% revenue on each new order, as well as a $5 referral fee for each successful new download:
- You will get a 5% commission on transactions ranging from $0.00 to $49.99.
- Receive a 10% commission on orders ranging from $50.00 to $99.99.
- You will get a 20% commission on transactions totaling $100.00 or more.

Who is eligible to be a Temu affiliate?
Temu claims that anyone with a social media account can sign up for their affiliate program. There are no specific follower count requirements or other strict eligibility criteria. However, it’s important to note that while anyone can apply, Temu does have an approval process.
While the program is open to a wide range of individuals, it’s generally more beneficial for those who have a strong online presence, such as:
- Social media influencers: Those with a significant following on platforms like Instagram, TikTok, or YouTube can leverage their influence to promote Temu products.
- Bloggers and content creators: Individuals who create content related to fashion, beauty, home goods, or other relevant niches can incorporate Temu products into their content.
- Website owners: Website owners with a significant amount of traffic can use affiliate links to monetize their audience.

How to become a Temu affiliate?
Step 1: Create a Temu Account
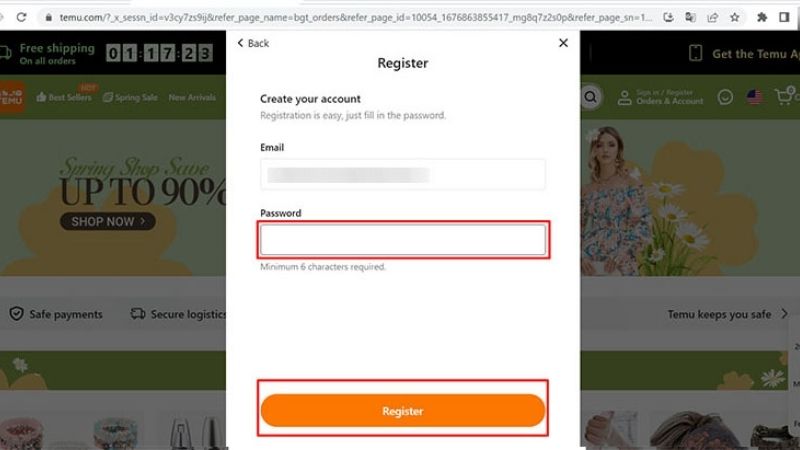
If you don’t already have one, create a Temu account on their website or app. The steps are as follows. Go to Temu’s affiliate registration page and click “Join Now” or “Sign Up” according to the platform. Next, enter your email, password and confirmation to complete the registration.
Step 2: Provide Required Information
You wil fill out the registration form with your personal information, including your name, email address, and contact details. You may also need to provide information about your social media accounts or website where you plan to promote Temu products.
Step 3: Agree to Terms and Conditions
The terms and conditions of Temu’s affiliate program should be read and accepted.
Step 4: Submit Your Application
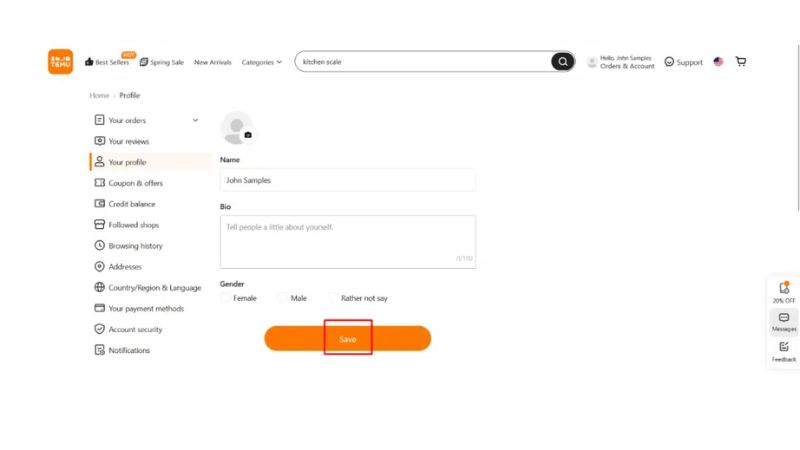
Once you’ve filled out the registration form and agreed to the rules, submit your application.
Step 5: Wait for Approval
Temu will review your application and notify you of their decision via email. It often takes a few days to get approved.
Step 6: Once approved, access resources
Once approved, you will be able to access the Temu affiliate program dashboard, where you will find all the following important resources: a unique tracking link that allows you to track the purchases made by your referrals and earn commissions.

How to withdraw money from Temu?
To withdraw your earnings from the Temu affiliate program, you typically need to reach a minimum threshold. Once you meet this requirement, you can initiate a withdrawal.
Here’s a general overview of the withdrawal process:
- Check Your Balance: Log in to your Temu affiliate account and check your balance to ensure you’ve reached the minimum withdrawal threshold.
- Select Your Payment Method: Temu often offers PayPal as a popular withdrawal method.
Initiate the Withdrawal: Follow the on-screen instructions to request a withdrawal. This usually involves clicking a “withdraw” button or a similar option. - Confirm the Withdrawal: Review the withdrawal information and confirm your request.
- Wait for Processing: Temu will process your withdrawal request, which may take a few business days.
- Receive Payment: Once processed, the funds will be transferred to your PayPal account.
Important Note:
The specific withdrawal process and minimum threshold may vary. It’s recommended to check the latest information from Temu’s official affiliate program documentation or contact their support team for the most accurate details.
By following these steps and keeping an eye on Temu’s official guidelines, you can smoothly withdraw your earnings from the Temu affiliate program.

4 Effective ways to make money from Temu Afffilate
To earn money efficiently via Temu Affiliate, you must have a defined marketing approach. Here are some ways to help you optimize your revenue:
Build a blog or website about the product
One of the most popular ways to do affiliate marketing is to build a blog or website specializing in the product you want to promote. You can write reviews, instructions, or compare products from Temu to attract readers.
When you create useful and relevant content, readers will easily trust and decide to buy through your link. Furthermore, a blog or website will provide long-term efficiency and a consistent source of revenue if your content is of high quality and value to visitors.
Take advantage of social networks: YouTube, TikTok, Instagram, Facebook…
Or an equally popular and easier way to market products is to take advantage of social networks such as Facebook, Instagram, TikTok, or YouTube. With the spreading power of these platforms, you can quickly reach millions of potential users without spending too much time.
You can build a channel with content reviewing, comparing, unboxing, experiencing, or entertaining, cleverly combining product introductions through your affiliate links. Or valuable seeding on groups…
Run ads
If you have a marketing budget, running ads on Google or Facebook can help increase sales quickly. You can run ad campaigns targeting potential audiences to increase conversion rates.
Note: You need to optimize your ad campaign to achieve the highest ROI (Return on Investment). And targeting the right potential customer file will help you reduce the cost of running ads.
Use email marketing.
Email marketing is another great marketing strategy for Temu Affiliates. You may create an email list of potential buyers and send out frequent emails presenting Temu items with affiliate links.
Tips: Focus on providing product value via email before asking customers to make a purchase.

Is the Temu affiliate program worth it?
Whether the Temu affiliate program is worth it depends on several factors, including your audience, niche, and marketing skills. Here are some pros and cons to consider:
Pros:
- High Commission Rates: Temu offers some of the highest commission rates in the industry, which can be very lucrative for affiliates.
- Diverse Product Range: With a wide range of products, you can find something to promote to almost any audience.
- Easy to Join: The program is easy to join, and there are no strict requirements.
- Regular Promotions and Sales: Temu frequently runs promotions and sales, which can increase your earning potential.
- Tracking and Analytics: You’ll have access to tools to track your performance and analyze your earnings.
Cons:
- Product Quality Concerns: Some people have raised concerns about the quality of Temu products, which could impact your audience’s perception of you and your recommendations.
- Competition: The affiliate marketing space is competitive, and there are many other programs to choose from.
- Reliance on Customer Acquisition: The Temu affiliate program seems to be heavily focused on customer acquisition, rather than product promotion, which may not be the best fit for all affiliates.
Ultimately, the decision of whether or not to join the Temu affiliate program is up to you. If you have a large audience that is interested in affordable products, and you are willing to put in the effort to promote Temu, then it could be a profitable opportunity. However, it’s important to be aware of the potential drawbacks and to weigh them carefully before making a decision.

FAQs
Temu affiliate program requirements
Temu’s affiliate program has minimal requirements, making it accessible to a wide range of individuals. Here’s the requirement:
- Age: You must be at least 18 years old.
- Social Media Account: You must have an active social media account (e.g., Instagram, TikTok, YouTube, Facebook, etc.) to promote Temu products.
- Temu Account: You’ll need a Temu account to sign up for the affiliate program.
Temu affiliate program countries list
Here are some countries that are part of the Temu affiliate program: the United States, UAE, India, Brazil, Mexico, Indonesia, the UK, MY, and PH. The commission rates vary by country. For example, in the UK, the rate is £3 per new or returning user, while in Bahrain, the rate is £12.58 per new user. Austria, the Netherlands, and Germany have the lowest prices, with new users paying £1.69 each.
You Might Also Like …
- How to Connect LAN Easily at Home: A Complete Guide
- Create free virtual phone numbers via website & app, updated 2024
- How to Compress Images Without Affecting Quality by TinyJPG?
Above is the simplest way to make money from Temu Affiliate and all the information you need to know about this program. If you find it useful, check out Exviews’ blog area for a variety of Facebook, Twitter, Instagram, and TikTok-related ideas. See you in the next article!

How to Connect LAN Easily at Home: A Complete Guide
How to Connect LAN Easily at Home? Knowing how to connect a LAN will help you share data and resources between computers on the same network. You can easily set up a LAN at home without any in-depth knowledge of technology. Let’s learn how to connect LAN easily at home quickly and conveniently with Exview through the article below!
How to connect LAN easily at home?
To be able to share the same internet source for two different computers. You need to connect them together through an internet port. Below are details on how to connect LAN for two computers that you can do at home:
Arrange the devices to connect LAN
Before connecting LAN between two computers. You need to fully prepare the necessary devices for the connection process to go smoothly. Below are the devices and tools you need to prepare:
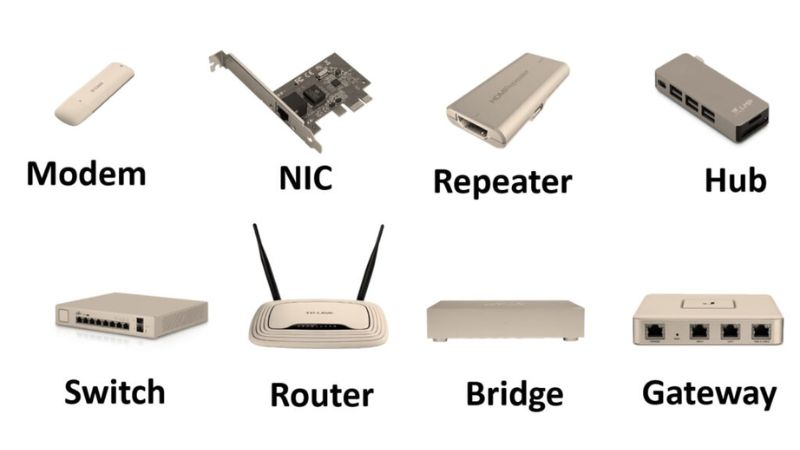
- Ethernet cable (LAN cable): This is the most important component in the LAN connection process. Ethernet cables are commonly used as Cat5e or Cat6. This type of cable helps to transmit data quickly and stably.
- Network splitter (Switch or Router): If you want to connect multiple computers via LAN. You will need a network splitter such as Switch or Router. These devices are responsible for sharing data between devices on the same network.
- Computers to connect: Make sure your computers have LAN ports (Ethernet ports) to connect with cables. Most computers today have LAN ports. But if your laptop does not have this port, you will need an additional USB-to-Ethernet adapter to connect.
- Stable power source: Make sure that the Switch or Router and other devices have stable power when setting up the network. The LAN connection will be interrupted if the network splitter or computer is disconnected.
After fully preparing the devices, you can start setting up the connection between two computers via LAN.
Set up LAN
Follow the instructions below to ensure the connection is correct and effective:
- Step 1: First, plug the power supply into the power outlet and plug it into the Switch.
- Step 2: Then plug the Ethernet cable into the Switch, the other end into the wifi router at home or office.
- Step 3: Take an Ethernet cable and plug one end into the LAN port of your computer. The other end of the Ethernet cable plugs into one of the ports on the Switch. Repeat this process with the other computer.
- Step 4: After all the computers have been connected to the Switch. If the lights on the Switch are on, it means the connection is successful.
After completing the connection steps and checking the signal lights on the Switch. You have successfully set up a LAN between the two computers.

Configuring the LAN
To configure the LAN between the computers, follow these detailed steps:
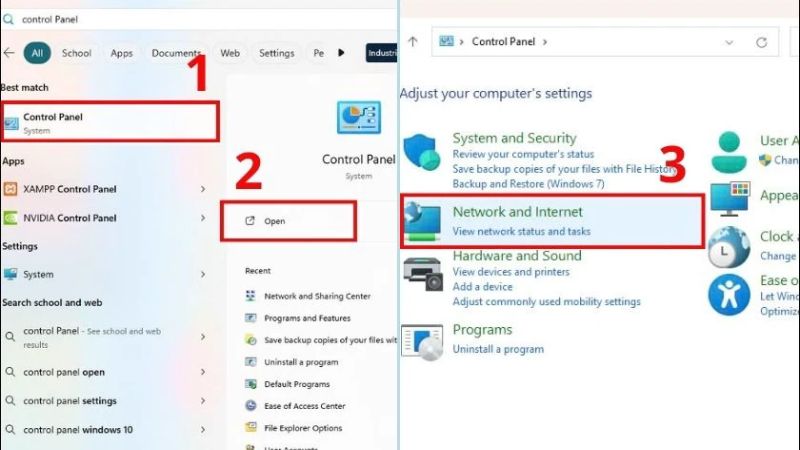
- Step 1: Click on the search bar and type Control Panel in the search bar and press Enter. Then select Network and Internet.
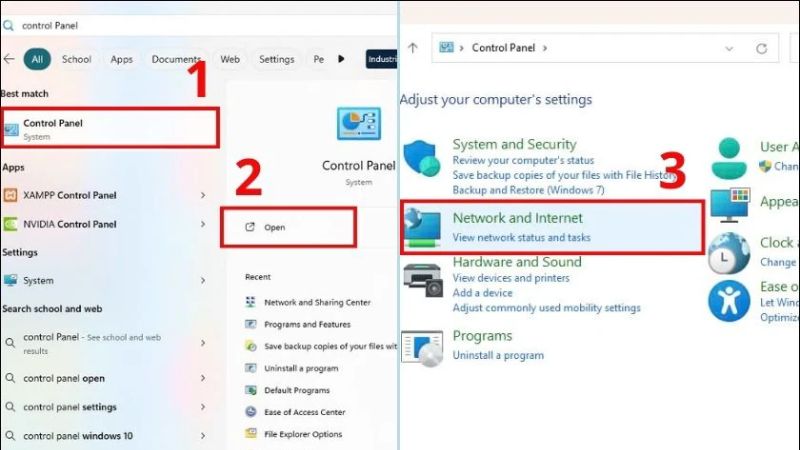
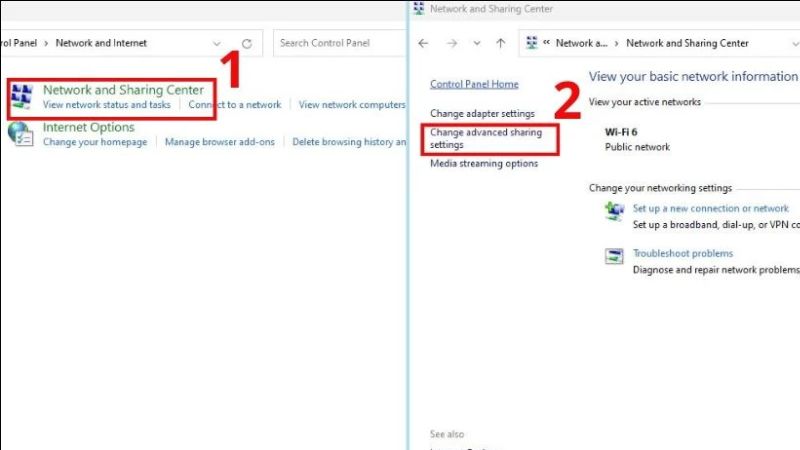
- Step 2: Next, select Network and Sharing Center. Look to the left and select Change adapter settings.
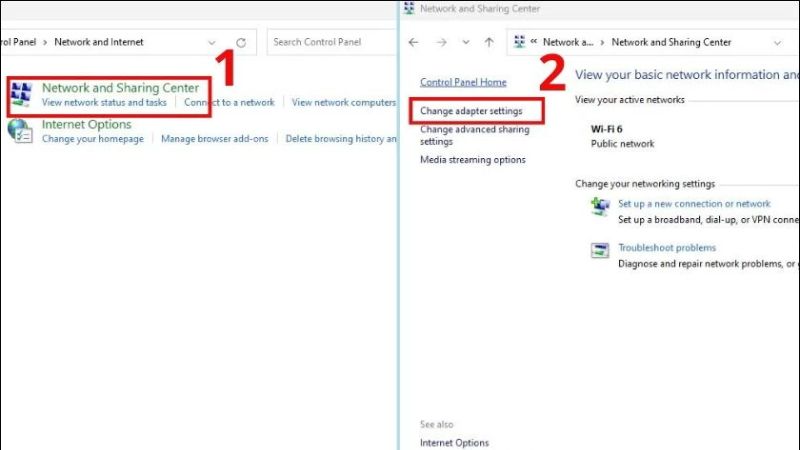
- Step 3: Now you will see the existing network connections. Continue to right-click on the network that has set up the LAN, select Properties. Then find and click on Internet Protocol Version 4 (TCP/IPv4).
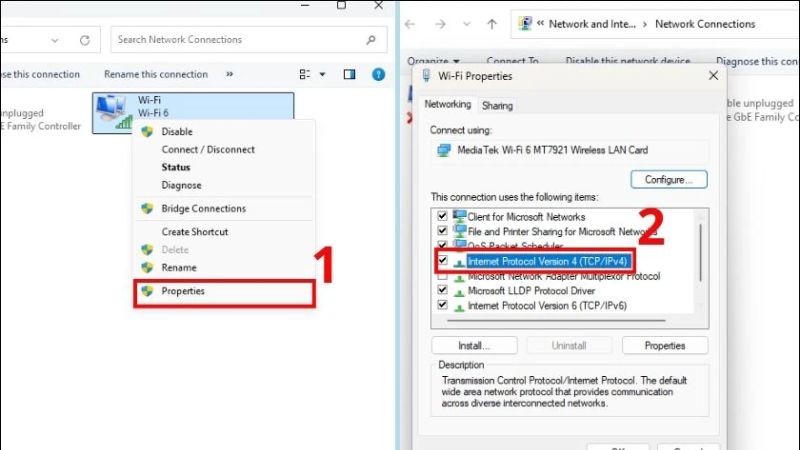
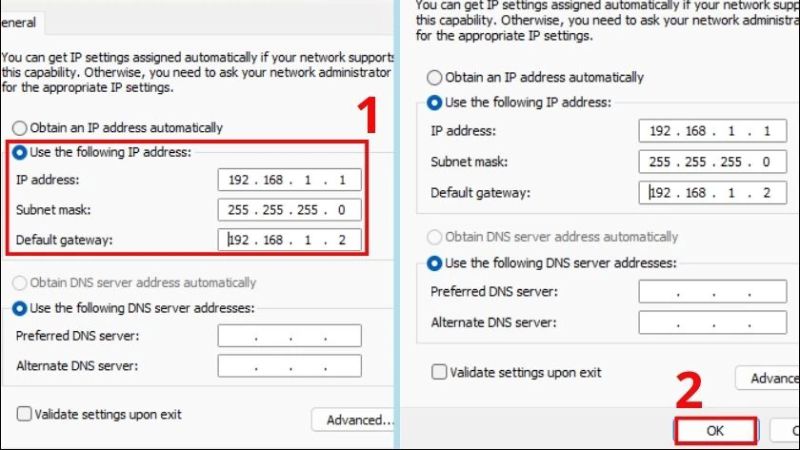
- Step 4: In the Internet Protocol Version 4 (TCP/IPv4) Properties window, select the Use the following IP address option. Now you will do the following:
- IP address: 192.168.1.1 (on computer number 2 enter: “192.168.1.2”).
- Subnet mask: 255.255.255.0.
- Default gateway: 192.168.1.2 (on computer number 2 enter: “192.168.1.1”).
After filling in all 3 items, click OK to complete the LAN configuration. Wish you success!
Note: Do the above steps for the other computer. This will help the LAN connection to the first computer go smoothly.
LAN Setup
After configuring LAN, LAN setup is the final process to connect two computers to LAN. Here are the simple and quick steps to setup:
- Step 1: Click on the search bar and type Control Panel in the search bar and press Enter. Then select Network and Internet.
- Step 2: Next, select Network and Sharing Center. Look to the left and select Change advanced sharing settings.
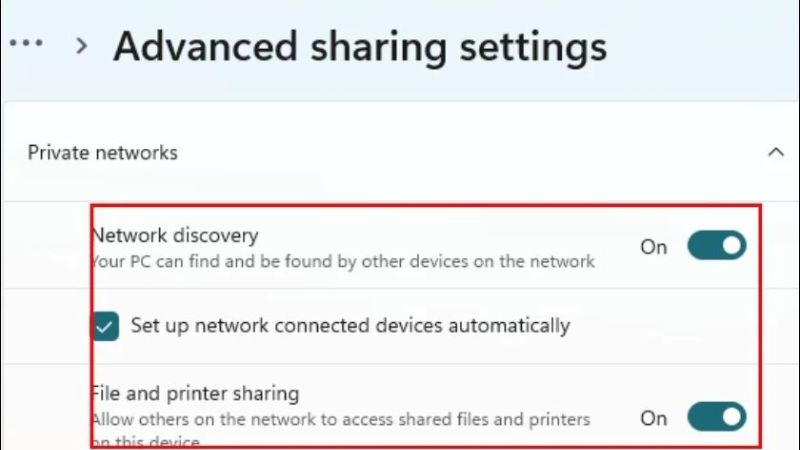
- Step 3: In the Private networks section, click to turn on Network discovery and File and printer sharing. Finally, click to check Set up network connected devices automatically to complete.
Note: Public networks and All networks should be set to Off by default. This ensures the security of your data because it is only shared with computers on the same network. If you want to share data with external network devices, you can turn it On.
How to share data between two computers via LAN
After connecting two computers via LAN. Sharing data will become much easier. Below are 2 quick ways to share, you can do it with just a few simple steps:
Use the share button on LAN
The first way is to share data between two computers via the share button. With just 3 extremely simple steps, you can complete sharing with the share button:
- Step 1: Right-click on the folder you want to share and select Properties. Then go to the Sharing section and click the Share button…
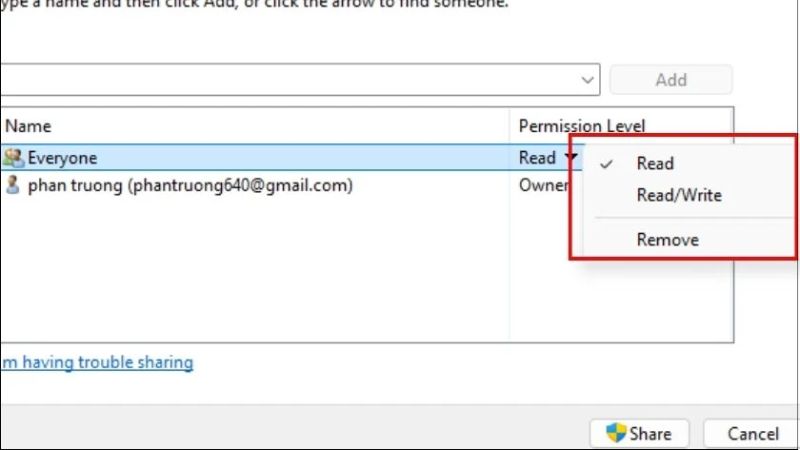
- Step 2: Click on the arrow and select Everyone and click the Add button. Then look at the Permission Level column of the Everyone section.

- Step 3: Now you can adjust the sharing permissions (Read; Read/Write). Or delete the friend you just added (Remove).
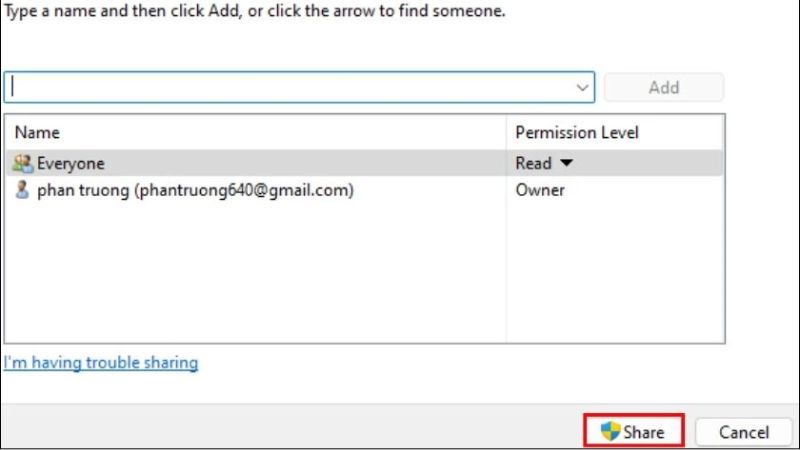
- Step 4: Then you click Share.
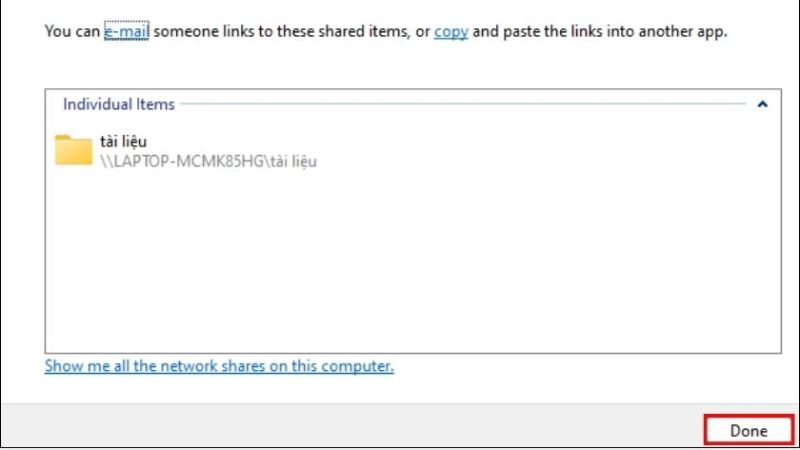
- Step 5: Now the folder you need to share appears. Finally, click Done and you’re done.
Share a folder using Advanced Sharing
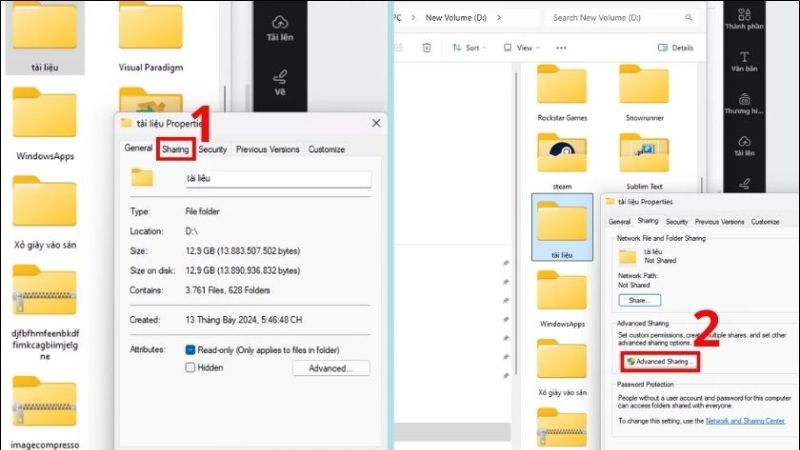
- Step 1: Right-click on the folder you want to share and select Properties. Then go to Sharing and click the Advanced Sharing button…
- Step 2: Click Share this folder. You can customize the number of users of the file at the same time in Limit the number of simultaneous users to.
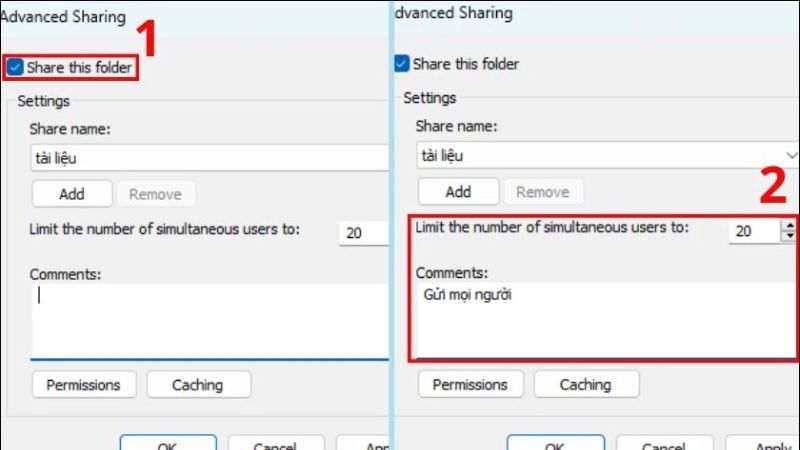
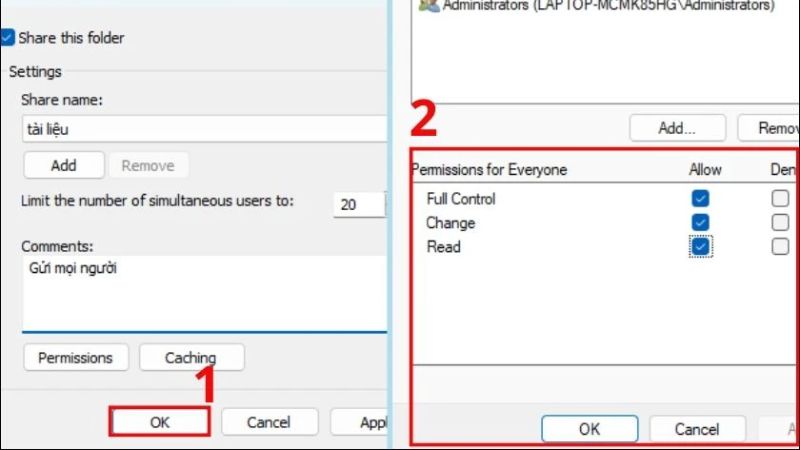
- Step 3: Next, click Permissions. At this point, the following permission options will appear:
- Full Control: The shared computer has the right to view, edit, delete, and copy the folder.
- Change: The shared computer has the right to change the shared folder.
- Read: The shared computer only has the right to read and copy the folder.
After you have selected the folder permission for the second computer, click OK to successfully share the folder using Advanced Sharing.
You Might Also Like …
- Create free virtual phone numbers via Website & App, updated 2024
- How to Compress Images Without Affecting Quality by TinyJPG?
- How to manage hundreds of Facebook accounts (2 Pro Ways)
Hopefully the above LAN connection methods will help you share data easily between two computers. If you need to buy network devices such as Switch or Ethernet cable. If you find it useful, regularly follow Exviews’s BLog section for many tips on using facebook, twitter, Instagram and tiktok. See you in the next article!

Create free virtual phone numbers via Website & App, updated 2024
Free virtual phone numbers are one of the flexible, cost-effective and secure communication solutions for personal information. Using virtual phone numbers is also very helpful in creating social accounts such as Google, Facebook, etc. This article from Exviews will introduce you to how to create free virtual phone numbers through websites and apps with 100% success guarantee.
What are free virtual phone numbers?
Free virtual phone number are understood as a phone number that does not owned by anyone and free. At the same time, the virtual number will not be directly linked to any fixed mobile device.
When using a virtual phone number to communicate, the call will still take place normally. But the data of this call will be sent over the Internet and the Internet will be the center of the call.
Up to now, no network operator in Vietnam has officially provided virtual numbers. Therefore, most virtual numbers are created through websites and third-party services on the market.

What is a virtual phone number for?
As technology develops, the need to own multiple social network accounts is becoming more and more necessary, especially for those who work as fanpage administrators or Marketers, etc.
However, creating accounts on social networking sites such as Facebook, Telegram, etc. or shopping sites such as Shopee, Lazada, etc. requires you to authenticate your account with your phone number as well as activate your account, retrieve your password, etc.
Of course, you will not be able to buy too many SIMs just to register an account, and at this time, creating a virtual phone number to receive messages or other countries such as the US, China, etc. is extremely useful.
Specifically, you can use a virtual phone number to:
- Register and authenticate social network accounts: When you need to create accounts on social networking sites such as Facebook, Telegram, etc. or shopping sites such as Shopee, Lazada, etc., a virtual phone number will help you authenticate your account without having to use a real number.
- Receive SMS messages and global confirmation codes: For those who need to use Chinese applications… and are required to have a domestic phone number to receive SMS confirmation. You can use a virtual number to solve this problem.
- Communicate with strangers without worrying about security: In some situations, you need to contact directly with people you do not know before. A virtual phone number will help you avoid revealing information to many people.
- Register in bulk for work: With a virtual phone number, you can register unlimitedly if you need to own many numbers at the same time. Knowing how to register a virtual phone number will help you optimize your work.

How to create free virtual phone numbers on the latest computer 2024
To create a virtual number, you cannot do it directly on your mobile phone but will need software, applications from a 3rd party provider or free virtual phone number creation websites to help you do that.
TextNow
To create a virtual number using the TextNow application on your computer:
- Step 1: Access the website textnow.com and select Sign up Free to register an account on TextNow.
- Step 2: You can register an account according to the instructions or use your Facebook or Gmail account to register.
- Step 3: After successfully registering an account, enter the country code and click Continue to continue.
- Step 4: Verify the CAPTCHA code and you have completed creating a virtual number

Free Phone Num
This is a website that provides virtual phone number generation services especially numbers from Canada and the US. On top of that, you can send up to 5 messages from a pre-generated list per day to other phone numbers.
Web link: freephonenum.com

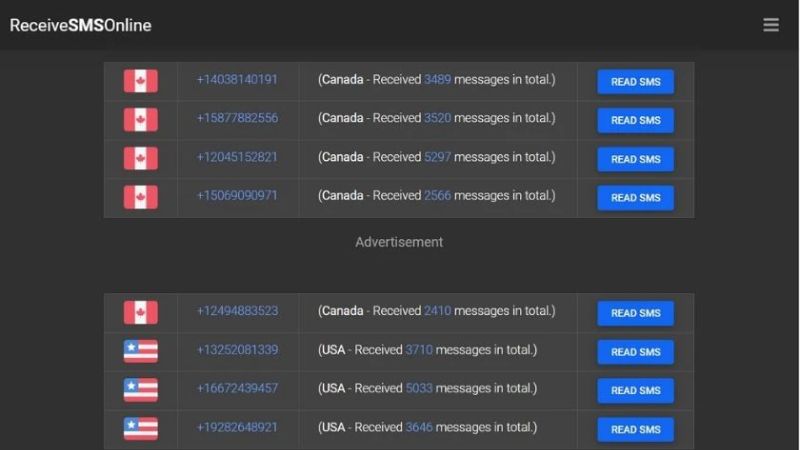
Receive SMS Online
Supports virtual numbers from countries like Canada, USA, UK, Sweden or even China. However, this website does not provide the Vietnamese +84 prefix.
Web link: receivesmsonline.net
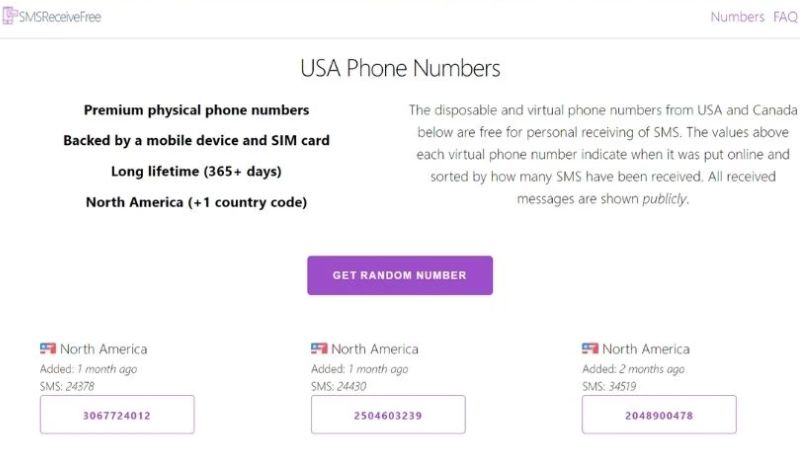
SMS Receive Free
With this website, users can get a virtual number by selecting the desired country’s landline number in advance. Or click Random Number, the system will randomly suggest a virtual mobile number for you.
Web link: smsreceivefree.com
Get Free SMS Number
Is a website that continuously updates millions of virtual phone numbers every second. In particular, the speed of receiving verification messages on the website is also very fast, you do not have to spend too much time waiting.
Web link: getfreesmsnumber.com
Receive Free SMS
Is a free website that provides virtual phone numbers from many major countries such as the UK, USA, Germany, Canada, Australia, … You can use it to verify your social network account without revealing your real phone number.
Web link: receivefreesms.com
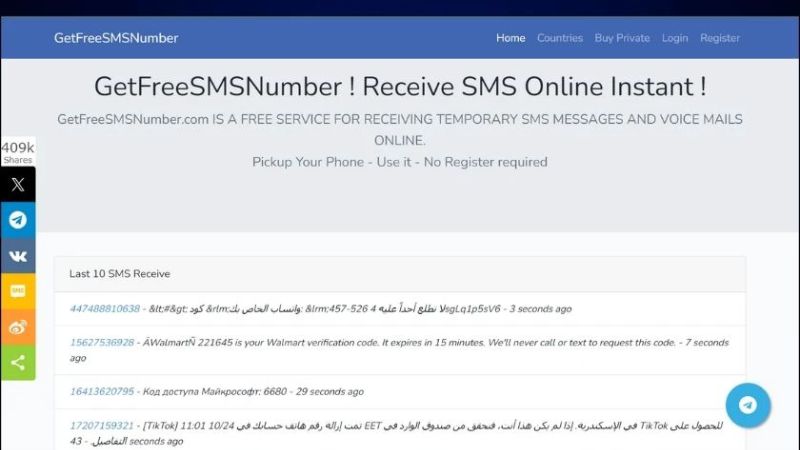
In addition to the above websites, there are many other websites that support creating international virtual numbers such as China, Hong Kong, Taiwan, USA,… that you can refer to such as:
sendatext.co/free-text
7sim.net/
receive-sms.cc/
5sim.net/
getfreesmsnumber.com/
smsreceivefree.com/
receivefreesms.com/
receivesmsonline.net/
receive-sms.com/
sms.sellaite.com/
Notes when using free virtual phone numbers
In addition to the benefits listed above, before deciding to use a virtual phone number, you also need to pay attention to the following points:
The call quality of virtual phone numbers may vary. Depending on the service you use, the call quality will be somewhat different.
Some services allow you to make international calls, while others do not. Therefore, make sure the service you register for offers this feature.
Virtual phone numbers on the web are all numbers created on virtual networks that are not real. They are only used to receive OTP codes, SMS, you cannot buy them.
If you are having any problems with your free virtual phone number. You can contact customer support for assistance. Because most of the services provided will support customers 24/7.

International Phone Number Area Codes
To create a virtual phone number, you first need to determine the virtual phone number area code you want to own. For example, to create a virtual phone number for Vietnam, you will find numbers starting with +84.
Some area codes of other countries you can refer to below:
+1 or 001: Canada, USA
+7 or 007: Russia
+49 or 0049: Germany
+44 or 0044: UK
+81 or 0081: Japan
+82 or 0082: Korea
+86 or 0086: China
+886 or 00886: Taiwan

You Might Also Like …
- How to Compress Images Without Affecting Quality by TinyJPG?
- How to manage hundreds of Facebook accounts (2 Pro Ways)
- Top 15+ Best Quality Video Making Software on Computer in 2024
With just a few basic steps, you can successfully create free virtual phone numbers. If you find it useful, regularly follow Exview’s BLog section for many tips on using facebook, twitter, Instagram and tiktok. See you in the next article!

How to Compress Images Without Affecting Quality by TinyJPG?
How to Compress Images Without Affecting Quality? In the era of the internet boom, images play an important role in attracting attention and conveying messages. However, using large-sized images can affect the loading speed of the website, consume storage space and bandwidth. Therefore, TinyJPG was born as an optimal solution to help users reduce image size while maintaining image quality.
In this article, Exviews will explain how it works, the benefits, and how to use the free online image compression tool Tiny JPG.
How TinyJPG Works?
Each uploaded image is thoroughly analyzed by TinyJPG to determine its structure, patterns, and colors. Based on the information gathered, the encoder creates an optimally compressed JPEG file, ensuring the smallest possible size while maintaining the best possible image quality.
The compressed image is then compared to the original and finely adjusted to ensure accuracy and consistency. TinyJPG also removes unnecessary metadata, further reducing the image file size.

Benefits of using TinyJPG
Here are some of the outstanding benefits of using TinyJPG:
- Helps reduce page load time, bandwidth, and storage space.
- Images are compressed with high precision, ensuring that the image quality is almost unchanged from the original.
- Simple interface, intuitive operation, suitable for all users.
- TinyJPG offers a free plan that allows compressing up to 5MB of images at a time.
- Compresses many popular image formats such as JPEG, PNG, WebP.
- TinyJPG offers a Windows application that helps compress images directly on the computer.
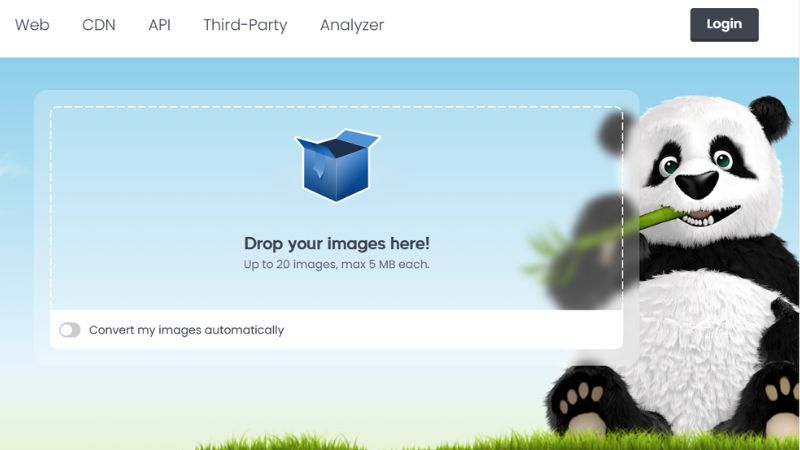
How to Compress Images Without Affecting Quality by TinyJPG?
Step 1: Visit TinyJPG’s website HERE
Step 2: Select the photo or drag and drop the photo you want to compress into the marked area. Supports compressing up to 20 photos at the same time, each photo is not more than 5MB.
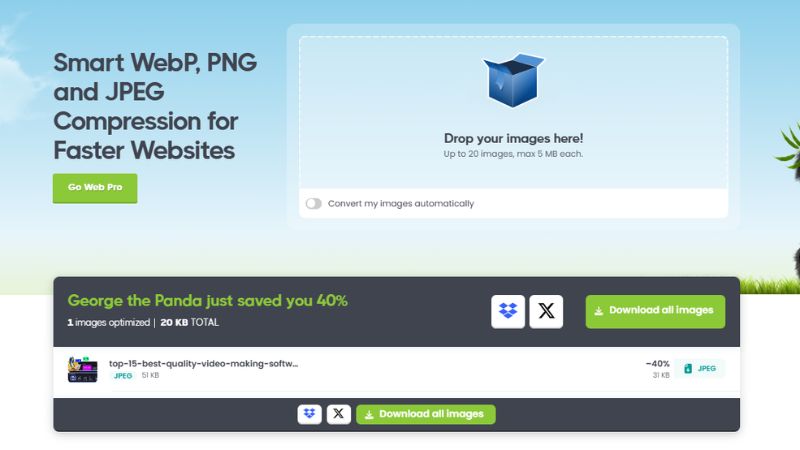
TinyJPG will automatically compress the photo to the optimal level. The compression process is fast, you can track the progress through the status bar.
Step 3: After compression is complete, you can download the photos to your computer by clicking the “Download All” button to download all the compressed photos as a zip file.
You Might Also Like …
- How to manage hundreds of Facebook accounts (2 Pro Ways)
- Top 15+ Best Quality Video Making Software on Computer in 2024
- Create free virtual phone numbers via Website & App, updated 2024
How to Compress Images Without Affecting Quality? After reading the information provided above, we hope you have given yourself the right answer. If you find it useful, regularly follow Exviews’s BLog section for many tips on using facebook, twitter, Instagram, Tiktok and so on. See you in the next article!

Top 15+ Best Quality Video Making Software on Computer in 2024
Are you looking for the best quality video making software on computer to help you create impressive and professional videos? Video making software on your computer today is not only diverse in features but also easy to use, suitable for both beginners and professionals. Let’s explore with Exviews the TOP 15+ best quality software to help you create perfect videos easily!
Features of video making software on computers
Video making software on computers is becoming more and more popular thanks to its ability to provide a series of powerful and diverse features. These software not only support video cutting and merging, inserting audio but also integrate many beautiful visual effects. Using simple video making software on computers also helps videos become more vivid and professional.
In addition, video making software on computers also allows users to edit high resolution, add text, insert logos and export videos in many different formats. Thanks to this feature, creating quality and attractive videos has become simpler than ever.

15+ Best Quality Video Making Software on Computer in 2024
Video editing software on computers has now become a useful tool not only for professional users but also for beginners. Below is a list of 15+ software to help you have more choices to suit your needs.
Adobe Premiere Pro Software
Adobe Premiere Pro is a professional video editing software, loved for its versatility and ability to handle many video formats from basic to complex. With Premiere Pro, users can edit all types of videos. From family videos to movies with resolutions up to 8K.
The software’s strength is its smooth integration with other Adobe applications such as Photoshop, After Effects, helping to create creative and high-quality video projects. However, the interface of Adobe Premiere Pro is quite complicated for beginners.
One thing to note is that this is a paid software. The trial version only lasts 7 days and has some limitations on the experience. In addition, the software requires a high-configuration computer to operate smoothly.

Slidely video making software
Slidely is not only a video editing software but also acts as a social network that allows users to share videos and follow other video collections. The highlight of Slidely is the ability to import videos from other social platforms and share directly to popular social networks such as Facebook or Instagram.
The software also allows users to adjust the video speed and set the private or public viewing mode as desired. The biggest drawback of Slidely is that the interface is not easy to use for beginners and the video processing speed is quite slow. Moreover, users cannot download edited videos. This reduces the flexibility of the software.

Simple video making software Magisto
Magisto is a simple but equally powerful video making software for PCs and laptops. The software allows users to create quality videos quickly without much editing skills.
In particular, Magisto supports sharing videos on social networking sites such as YouTube, Facebook, Instagram with a few simple steps. The software also provides private or public viewing options and the ability to flexibly adjust video speed.
Despite its many advantages, Magisto limits free accounts to 7 days and does not allow downloading videos to your computer. In addition, the video duration is limited to only 10 minutes, not suitable for long projects.

Proshow Producer – Easy video making software on computers
Proshow Producer is a versatile video making software on computers. The tool has the ability to adjust colors, effects, insert text and music as desired. The software supports many unique techniques to make videos vivid and attractive.
Proshow Producer is also known for its integrated computer tricks. From there, it helps users customize slideshow effects easily.
However, the software has some limitations such as not supporting Vietnamese typing and sometimes having errors in inserting music into slides. In addition, the software may have illegal errors for some versions.
Despite some minor technical issues, Proshow Producer is still the top choice for those who want to create creative and impressive slideshow videos.

Make videos on your computer quickly with Movavi Slideshow Maker software
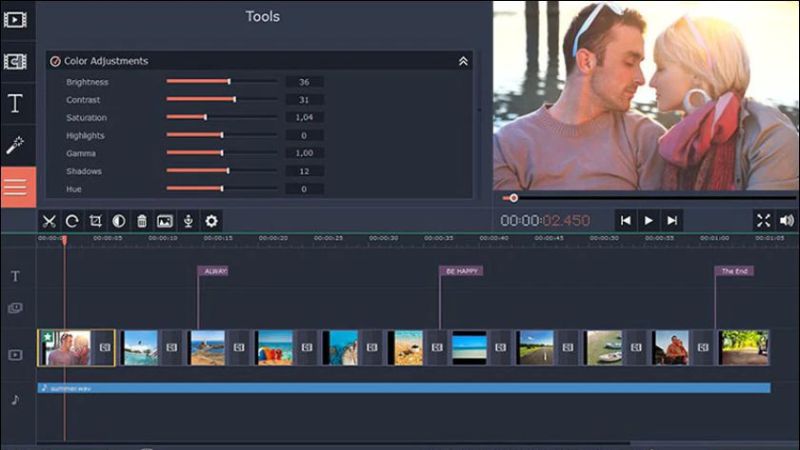
Movavi Slideshow Maker is aimed at general users, with a simple and easy-to-use interface. The software supports more than 150 image filters, 100 transition effects and 40 titles. This helps users easily create professional videos from personal images and videos.
In addition, users can add music, voice and upload videos to YouTube, Vimeo or Google Drive directly from the application. The downside of Movavi is that the full screen mode does not work properly and the videos show the words “Trial version” if using the free version.
However, with the paid version, users will experience the full features without encountering these limitations. Movavi Slideshow Maker is the perfect choice for those who want to create videos quickly and share them directly on social networks without too many complicated operations.
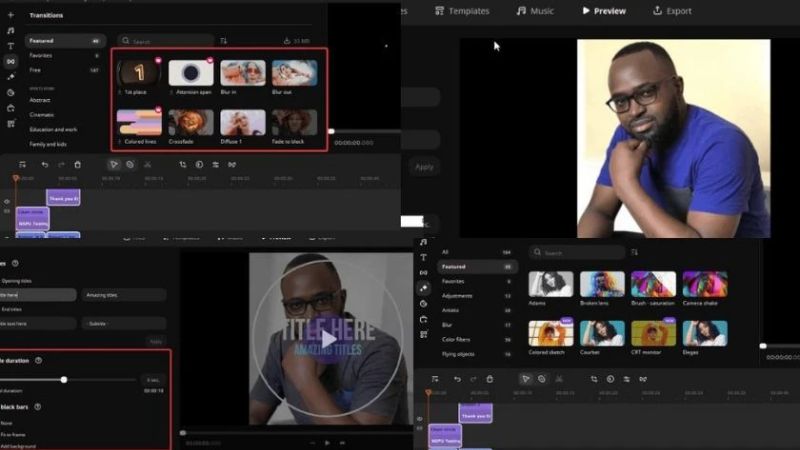
Video making software on Windows Movie Maker computer
Windows Movie Maker is a simple video editing and editing software on computers. Especially suitable for general users on all versions of Windows. In addition, the software allows users to create videos from images, edit, add background music and text to videos easily.
Not only that, users can also edit video quality, add motion effects quickly. As well as sharing videos to social networking sites like YouTube or Facebook with just a few simple steps.
However, the features of Windows Movie Maker are only basic, and the software is no longer supported for version updates. This leads to the software not supporting many new video formats and may encounter some compatibility issues.

Free video making software on computers FotoMagico 5
FotoMagico 5 is definitely a great choice for Macbook and iPad users who want to create quick and quality slideshow videos. This is a video making software on computers that supports 4K Ultra HD resolution. From there, it helps to create photo slideshow videos with excellent quality.
Moreover, the processing speed of FotoMagico 5 is impressive, it can complete a slideshow in just 15 minutes. However, FotoMagico 5 currently only supports macOS, which may be a limitation for Windows users. In addition, the software capacity is quite large, so the device must have a relatively high configuration.

Filmora9 Video Editor
Filmora9 Video Editor is a friendly and easy-to-use video making software. This tool is especially suitable for beginners. With an intuitive interface, users can create videos in just a few minutes. Not only that, users can also easily complete professional videos thanks to the rich audio library and diverse transition effects.
In addition, annotating and adding text to videos is easier than ever thanks to the many fonts and text templates available. However, some of Filmora9’s advanced features are only available in the paid version. This may be a drawback for those looking for completely free software.

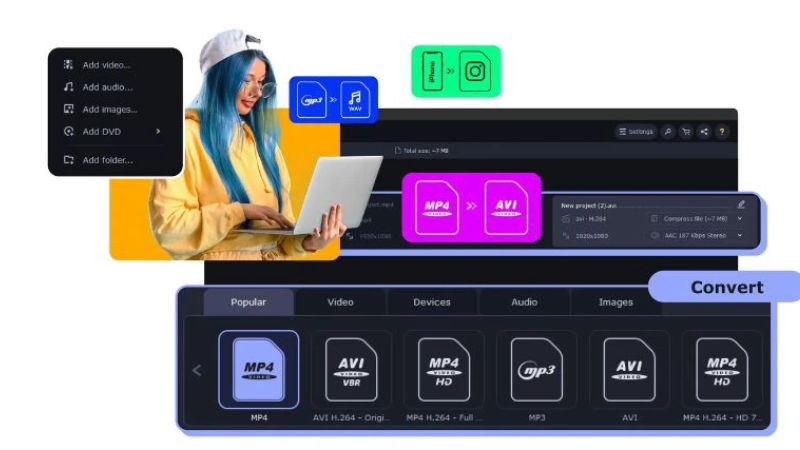
Freemake Video Converter
Freemake Video Converter is an ideal software for creating and editing videos easily on your computer. It is especially useful when you want to export videos in many different file formats. This software also offers the ability to upload videos directly to YouTube or convert to DVD, which is very convenient for ordinary users.
However, Freemake has some disadvantages such as lack of available templates and limitations in adding text to videos. In addition, the software only provides a few basic effects. Therefore, it is more suitable for users who need simple operations.
Animoto software makes videos easy
Animoto is the optimal solution for creating videos directly from the browser without downloading software. With many available styles to choose from, you can easily create attractive videos in a short time. Animoto also supports fast video processing and exporting speed to save users’ time.
However, Animoto’s free account has quite a few limitations on features. With the free version, the software’s logo will be inserted at the end of the video. Therefore, it affects the aesthetics of the final product.
iSkysoft Slideshow Maker
iSkysoft Slideshow Maker is a computer editing software for both ordinary and professional users. With more than 480 free slideshow templates, you can easily create videos from photos and add music according to your personal preferences. The software also supports sharing videos on popular social networks such as YouTube and Facebook, or saving directly to your phone.
However, the unattractive interface and slow video processing speed may be iSkysoft’s drawbacks. In addition, users of the free version will have to accept the watermark appearing on the video.

Free video making software on the computer Lightworks
Lightworks is a professional video editing software, suitable for those who work with high-quality videos. The software allows cutting, editing and synchronizing videos from many different camera angles quickly and accurately. In addition, Lightworks also supports real-time project sharing to platforms such as YouTube and Facebook.
Despite its powerful features, Lightworks is only suitable for professional video editors. The main reason is that the software is quite complex, requiring users to have specialized knowledge to use it. In addition, the free version of the tool also has many limitations, while the paid version is quite expensive.

Simple video editing software on computer ProShow Gold
ProShow Gold is a free video editing software, supports multiple platforms and is suitable for users of all levels. The highlight of ProShow Gold is that it supports many different video formats and codecs. The tool allows editing high-quality videos without converting formats. The software also provides powerful editing tools such as cutting, adjusting colors, and adding professional effects.
However, the interface of ProShow Gold can be confusing for beginners because it is not as intuitive as other software. In addition, the software requires a computer with a strong enough configuration to handle heavy tasks.

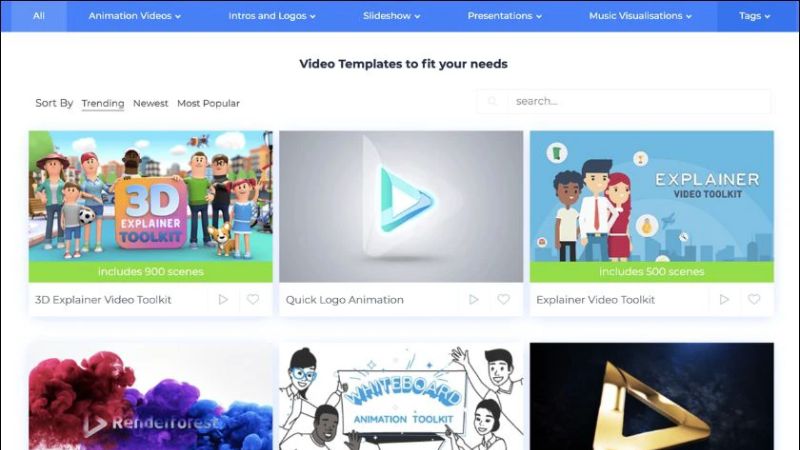
Renderforest – a video editing software on the computer that cannot be ignored
Renderforest is a famous video editing software on the computer with the ability to process professional colors and sounds. Therefore, the software is often “word of mouth” to use in film projects.
In particular, Renderforest supports resolutions up to 8K, helping users create high-quality video products. The software interface is also very intuitive and easy to use. At the same time, it provides many advanced features such as color correction, effects and sound.
However, the free version of Renderforest has some limitations in terms of features. Especially in the use of complex effects. In addition, this software requires a computer with a strong configuration to ensure smooth operation, especially when editing high-resolution videos.
Free video editing software on computers Openshot
Free video editing software on computers OpenShot is an ideal choice for beginners to get acquainted with video editing. With an intuitive interface, this software makes it easy for you to operate without requiring many complex skills.
OpenShot stands out with its ability to support unlimited layers, videos and sounds, providing flexibility for creating high-quality videos. The friendly drag-and-drop mechanism makes adding videos, images and sounds quick and convenient. In particular, this software is also ideal for those who want to make animated videos thanks to its specialized support tools.
However, OpenShot has a few drawbacks such as sometimes inaccurate error reporting and no support for smartphone users. If you are looking for a free, easy-to-use software to make videos on your computer, OpenShot is a worthy choice.

Which is the easiest video making software on your computer?
If you are looking for a simple, easy-to-use video making software on your computer, Movavi Slideshow Maker is a perfect choice. This software is aimed at general users. Therefore, it helps to create quality videos without requiring specialized skills.
With a friendly interface and enough features, this software is very suitable for those who want to start editing videos without spending much time getting used to it. To see the details of the pros and cons, don’t miss the information Dien Thoai Vui has listed for you about this software above.

You Might Also Like …
- How to manage hundreds of Facebook accounts (2 Pro Ways)
- How to Connect LAN Easily at Home: A Complete Guide
- Create free virtual phone numbers via Website & App, updated 2024
Above are suggestions for video making software on computers. We hope that readers can choose for themselves the most suitable software to use. If you find it useful, regularly follow Eviews’s BLog section for many tips on using facebook, twitter, Instagram and tiktok. See you in the next article!

How to manage hundreds of Facebook accounts (2 Pro Ways)
How to manage hundreds of Facebook accounts? In recent years, as more and more users, businesses, and agencies need to manage multiple Facebook accounts, operating multiple accounts has gradually become a regular activity for many advertisers and brand promoters. However, as Facebook has begun implementing the most stringent account locking campaign since its inception, causing many accounts to be locked due to non-compliance or suspected affiliated behavior.
This article by Exviews will analyze in depth the reasons why Facebook locks accounts and provide you with 2 ways to manage hundreds of Facebook accounts without being locked.
Facebook Account Lockout Occurs Frequently
In recent years, Facebook account locking has become a hot topic for advertisers and users. More and more accounts, especially those involved in running multiple accounts, are facing frequent account bans. This phenomenon is not accidental, but is the result of Facebook’s continuous efforts to strengthen its platform’s regulations to crack down on inappropriate behavior and protect user privacy.
According to multiple media and industry reports, Facebook’s account locking behavior focuses mainly on users who operate multiple accounts, accounts with suspicious behavior, and those who violate advertising policies. Some users report that their accounts are locked for “violating community standards” or “unusual account activity,” but many insist that they have not committed any malicious acts.
In addition, Facebook’s advertising policies are constantly being adjusted, with increasingly strict requirements for compliance and authenticity of advertising content. Behaviors such as fake identities, linking multiple accounts, or operating multiple accounts on the same device can trigger Facebook’s security system, causing the account to be marked as high risk, and thereby leading to account locking.

In this context, Facebook has increasingly rolled out automated detection mechanisms that analyze information about users’ devices, IP addresses, browser fingerprints, and other factors to identify potential violations. These policies are intended to protect the platform’s healthy ecosystem and combat malicious manipulation. However, for ordinary users and small businesses, this close supervision and strict rules have created great uncertainty, leading to many accounts being unjustly banned.
Therefore, Facebook’s storm of account bans is not an isolated phenomenon, but the result of measures taken by the platform to cope with the complex social network environment and increasing security challenges.
Facebook’s Attitude to Multiple Account Management: Risks in a Policy-Restricted Context
As Facebook continues to tighten its rules and security measures on its platform, many users are beginning to ask: Will Facebook allow a single user to register and use multiple accounts? Facebook’s policy provides a fairly clear answer to this question.
According to Facebook’s community standards and usage policies, each user is only allowed to own one personal account. This policy is intended to ensure the transparency and authenticity of the platform, and to minimize fake accounts, virtual identities, and fraudulent behavior. Facebook has always emphasized that user identities on its platform must be real individuals, which means that each person is only allowed to use one account for personal activities. Violating this policy, especially through multiple accounts to post content, advertise, or manage multiple business accounts, may trigger a security alert from the platform, resulting in the account being locked or limited.
However, while personal accounts must be unique, Facebook actually allows users to create multiple business accounts for different activities or projects. This means that while you can only own one personal account, you can manage multiple business pages or ad accounts under that personal account. This provides some flexibility for those who need to run multiple brands or ad campaigns.

How to Manage Hundreds of Facebook Accounts Safely According to Policy?
Facebook is cautious about running multiple accounts, for those who need to manage multiple projects, ads, or business accounts. However there are still some legal and effective methods to help them run multiple accounts without violating Facebook’s policies.
First of all, as mentioned, Facebook allows users to create and manage multiple advertising accounts and business pages under one personal account. This is a legal way and can be effectively managed through the Facebook Business Manager tool. With this tool, you can centrally manage multiple advertising accounts, set budgets, track advertising performance, and clearly assign permissions, ensuring that projects operate independently, minimizing the risk of account linking.
However, when operating multiple advertising accounts, especially when advertising in different countries or regions, many users have to use different personal accounts. In this case, Facebook’s strict verification mechanism will be able to link these accounts together. Therefore, it is necessary to use some technical tools to separate the operating environment, avoiding account blocking.
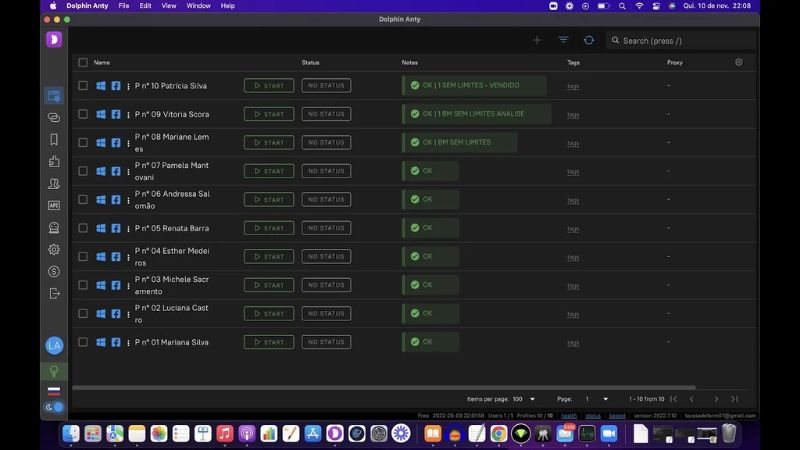
1. Using DICloak Antidetect Browser to Securely Manage Hundreds of Facebook Accounts
For businesses, agencies, and advertisers who need to manage a large number of Facebook accounts, DICloak Antidetect Browser provides a powerful and secure solution. Through real-life use cases, DICloak not only helps users overcome Facebook’s restrictions on managing multiple accounts, but also supports the effective management of hundreds of accounts, ensuring that each account is operated securely, independently, and completely isolated.
Create and import profiles in bulk
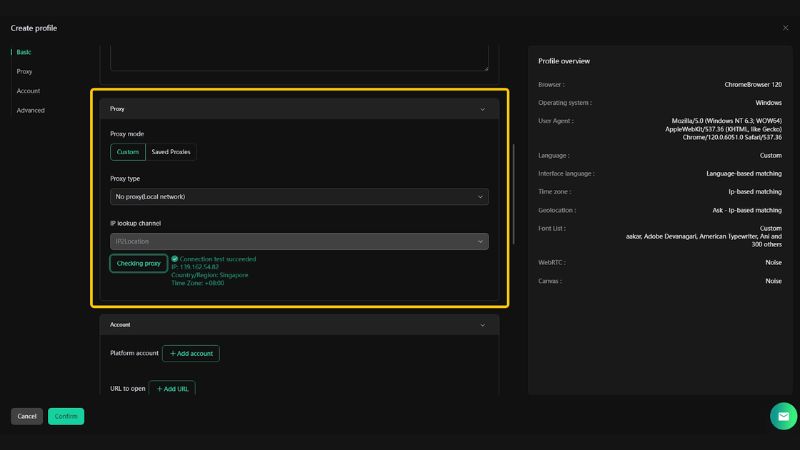
DICloak supports batch creation of browser profiles, allowing users to create independent operating environments for multiple Facebook accounts at the same time. Each profile has its own browser fingerprint and device information, ensuring that each account appears to be running from different devices. For existing profiles, DICloak also supports batch import, making the management setup process more convenient.
Whether you are creating new accounts or moving them between devices, DICloak’s batch feature will help improve management efficiency significantly.

Customize fingerprints and proxy configuration
DICloak allows you to customize the fingerprint of each browser profile, including operating system, browser plugins, screen resolution, display language, etc. This allows each Facebook account to have unique device information, avoiding linking between accounts. At the same time, DICloak supports bulk proxy import, which helps to allocate independent IP addresses to each account. Combining fingerprints and proxies, DICloak ensures that each account’s operating environment is completely independent and secure.
This flexible configuration is especially suitable for users who need to manage a large number of accounts, helping them to ensure both safety and high efficiency in account management.

Profile Isolation: Safe and Reliable
With DICloak, users can easily create browser profiles that operate completely isolated, ensuring that different Facebook accounts do not share any data or device information. This feature helps prevent Facebook from detecting the connection between accounts and mass blocking, providing peace of mind when operating multiple accounts.
Browser Profile Management: Optimized Batch Management
DICloak provides convenient management features such as opening, closing, deleting, and transferring profiles in bulk. This means that when you need to manage hundreds of Facebook accounts at the same time, you can perform management operations with just one click.
In addition, DICloak supports group collaboration, allowing multiple users to access and work on a single browser profile, facilitating group members to collaborate without worrying about conflicts or account linking.
Cloud Data Synchronization: Ensuring Consistency Across Multiple Devices
DICloak’s cloud data synchronization feature brings great convenience to users who work on multiple devices. After logging in on a device, you can sync all browser profiles via the cloud, without having to log in again or set up from scratch. This saves time and ensures data consistency and security across all devices.
Whether you are working on a corporate computer or a personal device, DICloak ensures continuity and smooth transitions between devices.
Open Multiple Profiles: Flexible Team Collaboration
In many real-life situations, team members may need to work on a single Facebook advertising account at the same time. DICloak’s multi-profile feature allows multiple users to access and work on a single browser profile, creating an efficient collaborative management process. For example, marketing teams can handle multiple advertising accounts without worrying about conflicts or links between accounts.
2. Using Proxy Servers and VPNs
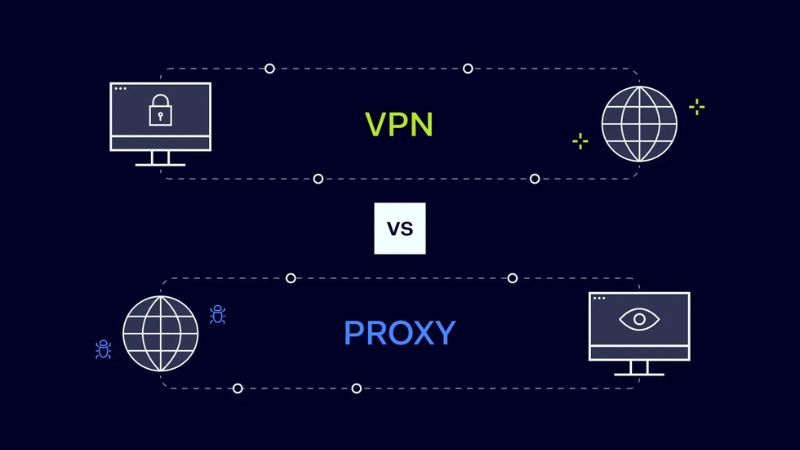
Many users choose to use proxy servers or VPNs to mask their IP addresses, which helps prevent multiple accounts from being linked through the same IP. By allocating a unique IP address to each account, you can reduce the risk of being flagged by Facebook for account linking. Different IP addresses help the platform identify these accounts as different users or operating environments, thereby reducing the risk of account blocking.
However, it is important to note that using a VPN or proxy is not a completely secure solution. Facebook’s verification mechanism relies not only on IP addresses, but also on means such as device fingerprinting to detect account linking.
You Might Also Like …
- How to Connect LAN Easily at Home: A Complete Guide
- How to manage hundreds of Facebook accounts (2 Pro Ways)
- Create free virtual phone numbers via Website & App, updated 2024
How to manage hundreds of Facebook accounts? After reading the information provided above, we hope you have given yourself the right answer. If you find it useful, regularly follow Exviews’Blog section for many tips on using facebook, twitter, Instagram and tiktok. See you in the next article!

Introduction to goview application
GoView is an application that facilitates cross-exchange views on social platforms like Facebook, YouTube, and TikTok. It enables users to enhance engagement by watching others’ videos to earn reward points (coins) that can later be spent to increase views for their own content.
Key Features:
Real user views: Views generated through the platform come from real users, ensuring organic interaction.
Simple interface: Easy to use with straightforward navigation.
Flexible top-up options: Users can buy coins via methods like Momo, bank transfers, or Google Play, with varying discounts based on the amount recharged.
Using GoView helps users efficiently boost views, particularly in the early stages after posting, when platforms like YouTube and TikTok determine what content to recommend. This can increase the chance of their videos being featured through recommendation algorithms.

Benefits:
Safe and high-quality views, reducing the risk of platform penalties.
Unlimited views as long as other users continue to engage with the content.
Save time by automating the process of view generation compared to manual promotion.
By leveraging GoView, creators can quickly enhance their visibility and engagement, potentially leading to better exposure on social media platforms
Download app https://play.google.com/store/apps/details?id=com.metech.goviews&hl=en

